~ 9 min read
Generating presentation titles using OpenAI background jobs with Node.js, Express and Trigger.dev

In this article, you’ll learn how to use OpenAI background jobs with Node.js, Express, and Trigger.dev to generate creative presentation titles automatically. We’re going to build this cool app with the help of LLMs and Generative AI:
Introduction to background job processing in Node.js
Background job processing is a technique for running tasks that can take a long time to complete in a separate process from the main application server. This allows the main application server to continue to handle requests from users while the background jobs are running.
There are many reasons why you might want to use background job processing in your Node.js application. For example, you might use it to:
- Process large files or images via Upstash
- Send email or SMS messages via Twilio
- Query OpenAI for ChatGPT style interactions
Trigger.dev is an open source project as well as a hosted SaaS platform that is specially-designed (at this point in time) to process short-lived background jobs executed via serverless functions.
Trigger.dev is thus somewhat different in use-cases and applicability to alternative approaches to background job processing in Node.js that you might be familiar with such as messages queues managed via BullMQ and Redis, or RabbitMQ. The best approach for you will depend on your specific needs and requirements. In this article, we’re focusing on setting up Trigger.dev with an Express application to provide a rudimentary ChatGPT-like interface powered by the OpenAI APIs.
About Trigger.dev
Trigger.dev is an open-source platform for creating short-lived jobs directly in your Next.js app with API Integrations, webhooks, scheduling and delays. Trigger.dev uses a serverless functions model the job. This is a compelling use-case because serverless functions are:
- Scalable: Serverless functions can be scaled up or down automatically to meet demand, so you don’t have to worry about managing your own infrastructure. This means you can easily re-use the same platform you use for hosting your frontend or fullstack apps: Vercel and Netlify.
- Cost-effective: Serverless functions are only charged when they are running, so you only pay for the resources you use.
I believe the highest value you get from using Trigger.dev is that it allows you to colocate your background job worker with the rest of your application domain, and perhaps more conveniently, it removes any requirements for dedicated hosting because it makes it trivial to use serverless functions for the job processing just as if it was any other API request that you had to serve from your Vercel or Netlify hosting.
Getting started with a Trigger.dev account
We are going to use the SaaS version of Trigger.dev so we can skip setting up a local instance in our own infrastructure of Trigger.dev.
So, first head over to www.trigger.dev and create a new account, and setup a new organization and project in which our jobs will be scheduled.

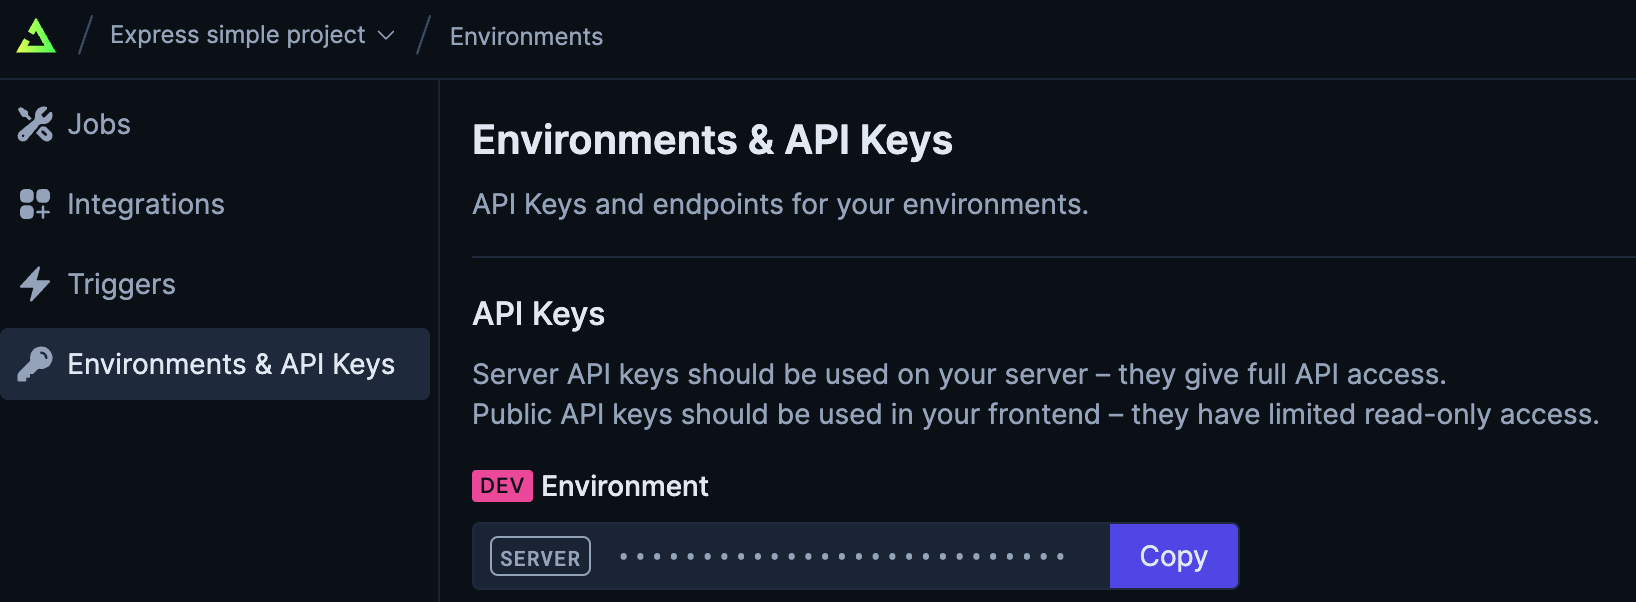
Then click into the project details you created and head over to the Environment & API Keys to get a copy of the API key. We’re going to use the Dev Environment API key so keep a copy of it handy.
Setting up an Express project with Trigger.dev
I am going to review the parts of the Trigger.dev integration that build into a working Express application in Node.js, all of which is based on a fully functional frontend and backend reference example in a GitHub repository Trigger.dev Express example.
Our Express application is a full stack app that generates titles using OpenAI API. The project structure provides the following:
- A frontend built with vanilla JavaScript. No frameworks or libraries, which helps keep the complexity down and understand easily.
- An Express own middleware (
express.static()) is used to serve the HTML, CSS and JavaScript via thepublic/directory.
- An Express own middleware (
- A backend API that defines the following:
- A POST endpoint at
/api/triggerthat is reserved to communicate with the Trigger.dev platform - A POST endpoint at
/api/titlesthat accepts a presentation description and then triggers an event (schedules a background job) to generate a title using the OpenAI API. - A GET endpoint at
/api/titlesthat returns the generated title text when the OpenAI API finished processing.
- A POST endpoint at
- A
.envfile that stores the OpenAI and Trigger.dev API keys. The.envfile is ignored in the git workspace, so you can rename the.env.samplereference as a starting point.
Clone the Git repository
Clone the Git repository of the Express app from: https://github.com/lirantal/trigger.dev-express-example-integration
git clone https://github.com/lirantal/trigger.dev-express-example-integrationInstall dependencies
Make sure you change directory to the cloned git repository: cd trigger.dev-express-example-integration and install dependencies:
npm installPopulate API keys in .env
Update the .env file with your OpenAI and Trigger.dev API keys:
PORT=3000
TRIGGER_API_KEY=tr_dev_1234
OPENAI_API_KEY=sk-1234
Note: if you need to use a different port than the default ‘3000’ than you’ll also need to tweak the
npm run trigger:devrun-script command start the tunnel with a different local port binding
The Trigger.dev Express integration walk-through
If you’re all too excited you can skip to the next section to start the server locally (totally understandable!), or if you have some patience and want to learn how the Express integration of Trigger.dev works then keep reading.
We start off by importing all the required dependencies: dotenv to load the environment variables from .env. and make it available in process.env. Load the Express library, and the Trigger.dev SDKs and integrations.
const dotenv = require("dotenv");
const express = require("express");
const { TriggerClient, eventTrigger } = require("@trigger.dev/sdk");
const { createMiddleware } = require("@trigger.dev/express");
const { OpenAI } = require("@trigger.dev/openai");

let titleGeneratedText = null;

dotenv.config();
You’ll notice that we keep a variable titleGeneratedText to hold the generated title value. By now you’ve realized how naive this application is since it manages no real state or storage.
Notice how we don’t import the official OpenAI SDK and that’s because the Trigger.dev integration is going to handle that for us (it basically mirrors the API and makes it easier to schedule long-running IO jobs like OpenAI requests in which the job worker mostly idles until a response is returned).
Next up we instantiate the Express server setup while making sure we also enable the JSON body parser and URL Encoding middleware functions:
const port = process.env.PORT || 3000;
const app = express();
app.use(express.json());
app.use(express.urlencoded({ extended: true }));
Let’s get the Trigger.dev and OpenAI APIs ready:
// Instantiate the Trigger.dev client
const client = new TriggerClient({
  id: "trigger-express-example-integration",
  apiKey: process.env.TRIGGER_API_KEY,
});

app.use(createMiddleware(client));

// Instantiate the OpenAI integration for Trigger.dev
const openai = new OpenAI({
  id: "openai",
  apiKey: process.env.OPENAI_API_KEY,
});
The createMiddleware(client) function is imported from the official Trigger.dev Express package and registers a handler on the /api/trigger route. This API endpoint has to be reserved for the Trigger.dev integration to work.
Next up, we define a job to handle title generation requests.
In Trigger.dev, a defined job is composed of the following details:
- A job’s description: an identifier, name, and version. Notice that the
versionkey is required and has to be semver-compatible. - A
triggerkey which defines how this job is triggered. In our case, it’s an event that we call from our own code using the Trigger.dev SDK. We give it a nametitle.generate. - Any integrations that would be available to the background job work. In this case,
openaiwhich refers to the instantiated OpenAI integration from Trigger.dev. - The background job worker defined in the
runkey as an async function accepting:payload, andiovariables.
// Defines a new background job
client.defineJob({
  // 1. Job Metadata
  id: "express-title-generator",
  name: "Express Title Generator",
  version: "1.0.0",
  // 2. Trigger is defined as a custom code-triggered event
  trigger: eventTrigger({
    name: "title.generate",
  }),
  integrations: {
    openai,
  },
  // 3. The Run function which is called when the job is triggered
  run: async (payload, io) => {
    // This simple run just logs the payload and returns it
    const result = await io.openai.backgroundCreateChatCompletion(
      "Generating summary",
      {
        model: "gpt-3.5-turbo-16k",
        messages: [
          {
            role: "user",
            content: `The following is a description of a presentation, often submitted to call for papers to speak at events. Only reply with a title that would best fit this description: ${payload.talkDescriptionText}`,
          },
        ],
      }
    );

    if (!result.choices || !result.choices[0] || !result.choices[0].message) {
      io.logger.error("Failed to process OpenAI request");
      return;
    }

    const title = result.choices[0].message.content;
    titleGeneratedText = title;

    return { titleGeneratedText };
  },
});
The background job worker uses the OpenAI integration via io.openai and calls the unique-to-triggerdev function called backgroundCreateChatCompletion which is responsible to schedule the OpenAI request to the familiar chatCompletion API from OpenAI - but specifically, it runs this IO request on Trigger.dev’s own infrastructure. This is needed because short-lived serverless functions like those on Heroku, Vercel or Netlify are limited in their overall execution time. So for example, a function on Vercel is limited to 10 seconds and if you had used the OpenAI SDK directly in this job and it had taken 10 seconds or more, then Vercel will simply terminate the function and thus failing the job processing.
The rest of the background job worker here is straight-forward in its use of the OpenAI API and concludes with updating the global variable titleGeneratedText with the generated text.
I’m again reminding you that this is by no means any close to production code with mutating global variables like this so do not follow this in production or remotely demonstrate-able work that is beyond a learning practice otherwise you’re bound to run into problems (racing conditions, etc)
Finally, we have the API endpoints to trigger title generation and check on title data readiness:
app.get("/api/titles", async (req, res, next) => {
  return res.json({ title: titleGeneratedText });
});

app.post("/api/titles", async (req, res, next) => {
  await client.sendEvent({
    name: "title.generate",
    payload: { talkDescriptionText: req.body.talkDescriptionText },
  });

  return res.json({ message: "new job added to queue" });
});
Running the example Express, OpenAI and Trigger.dev application
To have a functional application of our OpenAI generated presentation title application we need to simultaneously execute two commands:
npm run start- start the Express application (remember, it hosts both the backend and the frontend, so this is all that is needed for the app) on localhost.npm run trigger:dev- spawns a tunnel so that the Trigger.dev platform can communicate with the locally running Express app on localhost
Note that if you make any changes to the application identifier under which you registered the Trigger.dev SDK you also need to update the
trigger.devsection and theendpointIdkey in thepackage.jsonfile accordingly.
Have fun!
