~ 3 min read
Home Assistant YouTube DNS Blocking with AdGuard and Lovelace Buttons Setup

In a prior article I’ve written how to block client devices in your LAN from accessing YouTube on Home Assistant but that setup was somewhat clunky because of the switch interface on the Lovelace UI. Since then, I’ve been wanting to move to a more action friendly interface via the Lovelace UI with the help of purpose-specific buttons that can be clicked to toggle the DNS blocking on and off.
The reason for using buttons instead of a switch is that a switch inherently needs to derive a state to be able to properly send the “on” or “off” state to the AdGuard Home integration. This is because the switch is a binary state and it’s not clear whether the switch is on or off when the Lovelace UI loads. If you aren’t planning to overly complicate the state management via GET requests to the AdGuard integration then we can keep things easier with buttons.
Setting up Home Assistant YouTube DNS blocking with Lovelace Buttons
So first thing we need to do is define the command line API calls with curl via the following configuration.yaml definition:
command_line:
  - switch:
      name: Strict Entertainment Media
      unique_id: strict_entertainment_media
      command_on: 'curl -X POST -m 10000 -H "content-Type:application/json" -s -u "username:password" http://a0d7b954-adguard:3000/control/clients/update -d "{\"name\": \"HouseholdPublic\",\"data\":{\"name\":\"HouseholdPublic\",\"ids\": [\"192.168.68.52\", \"192.168.68.50\", \"192.168.68.61\", \"192.168.68.51\",\"192.168.68.58\"],\"tags\": [],\"upstreams\": [],\"filtering_enabled\": true,\"parental_enabled\": true,\"safebrowsing_enabled\": true,\"safesearch_enabled\": true,\"use_global_blocked_services\": false,\"use_global_settings\": true, \"blocked_services\": [\"youtube\"]}}"'
      command_off: 'curl -X POST -m 10000 -H "content-Type:application/json" -s -u "username:password" http://a0d7b954-adguard:3000/control/clients/update -d "{\"name\": \"HouseholdPublic\",\"data\":{\"name\":\"HouseholdPublic\",\"ids\": [\"192.168.68.52\", \"192.168.68.50\",\"192.168.68.61\", \"192.168.68.51\",\"192.168.68.58\"],\"tags\": [],\"upstreams\": [],\"filtering_enabled\": true,\"parental_enabled\": true,\"safebrowsing_enabled\": true,\"safesearch_enabled\": true,\"use_global_blocked_services\": true,\"use_global_settings\": true, \"blocked_services\": []}}"'
In this setup, I still maintain separate commands for on and off state via a so-called switch but we’re going next to create a script for each of these commands that will be used by the Lovelace UI buttons.
Open up your scripts.yaml file and add the following:
block_youtube:
  alias: Block YouTube
  sequence:
    - service: switch.turn_on
      target:
        entity_id: switch.strict_entertainment_media

unblock_youtube:
  alias: Unblock YouTube
  sequence:
    - service: switch.turn_off
      target:
        entity_id: switch.strict_entertainment_media
These are now service scripts which can be called by the Lovelace UI buttons. Next up, we’re going to create the Lovelace UI buttons.
Creating Lovelace UI buttons for YouTube DNS blocking
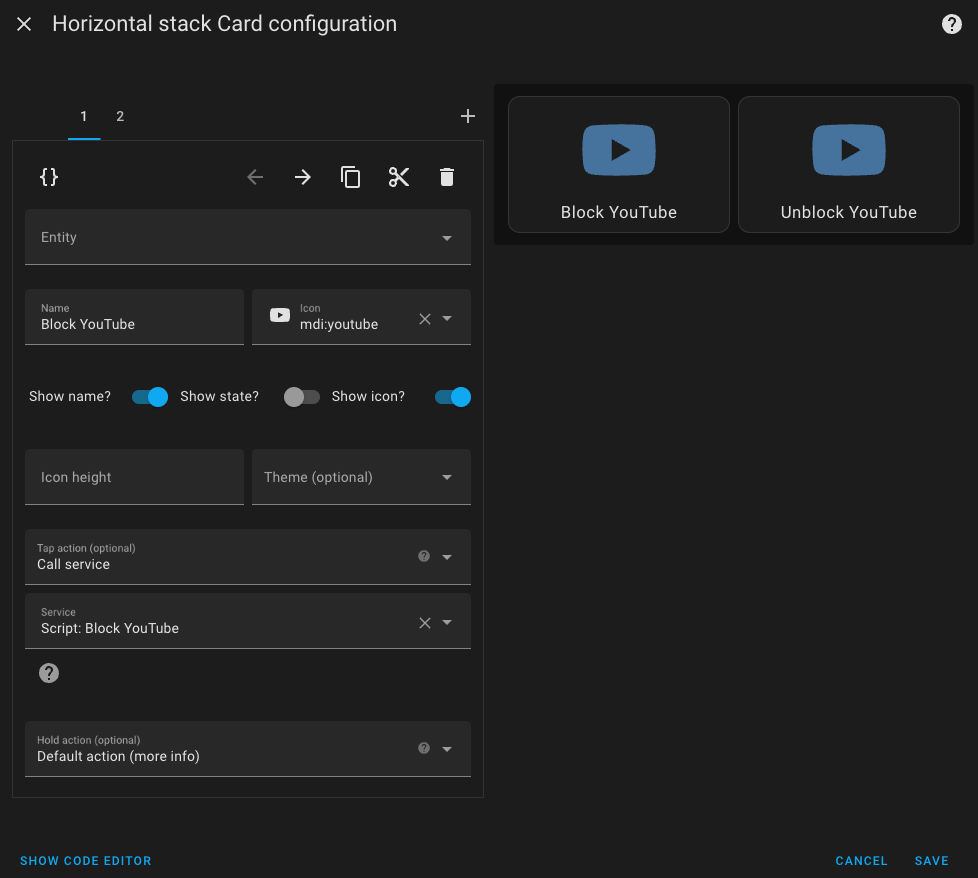
We are going to end up with the following buttons layout:

And here is how the visual editor looks like to get that setup:

The Lovelace UI configuration for the buttons is as follows:
type: horizontal-stack
cards:
  - show_name: true
    show_icon: true
    type: button
    tap_action:
      action: call-service
      service: script.block_youtube
      target: {}
    icon: mdi:youtube
    name: Block YouTube
  - show_name: true
    show_icon: true
    type: button
    tap_action:
      action: call-service
      service: script.unblock_youtube
    name: Unblock YouTube
    icon: mdi:youtube